Blue/Green Deployment Tutorial
Blue/Green deployment tutorial overview
A blue/green strategy shifts traffic from the running version of your software (blue) to a new version of your software (green). You can preview the green version before approving the full deployment.
This tutorial uses a single Kubernetes cluster with multiple namespaces to simulate multiple clusters. If you don’t have a Kubernetes cluster, you can install one locally using kind, which is a tool for running a lightweight Kubernetes cluster using Docker. Your cluster does not need be publicly accessible.
The sample code is in a GitHub repo branch that you clone as part of this tutorial.
Learning objectives
- Install the CLI so you can deploy from the command line.
- Create Client Credentials so you can connect your Kubernetes cluster.
- Connect your cluster by installing a Remote Network Agent.
- Clone the repo branch so you have the code for this tutorial.
- Explore the app v1 files.
- Deploy the first version of the app using a canary strategy.
- Explore the app v2 files to learn how to implement a blue/green strategy.
- Deploy the second version of the app using a blue/green strategy.
- Clean up installed resources.
If you have already installed the CLI and have connected a cluster, you can start at the Clone the repo branch step.
Before you begin
- You have completed the CD-as-a-Service Quickstart, which guides you through deploying a sample app.
- You are familiar with deployment strategies and blue/green.
- You have a GitHub account so you can clone a repo branch.
Install the CLI
brew tap armory-io/armory
brew install armory-cli
You can install the CLI with a one-line script that does the following:
- Fetches the correct Armory Version Manager binary (
avm) for your operating system - Installs the AVM binary
- Uses the AVM to install the CLI binary (
armory) - Adds the AVM and the CLI to the path in your bash or zsh profile
Execute the following script on the machine that has access to your Kubernetes cluster:
curl -sL go.armory.io/get-cli | bash
After installation completes, you should start a new terminal session or source your profile.
Download the AVM for your operating system and CPU architecture. You can manually download it from the repo or use the following command:
curl -LO https://github.com/armory/avm/releases/latest/download/avm-<os>-<architecture>For example, the following command downloads the latest version for macOS (Darwin):
curl -LO https://github.com/armory/avm/releases/latest/download/avm-darwin-amd64You can see the full list of available releases in the repo.
Give AVM execute permissions. For example (on macOS):
chmod +x avm-darwin-amd64Confirm that
/usr/local/binis on yourPATH:echo $PATHThe command returns your
PATH, which should now include/usr/local/bin/.Rename the AVM binary to
avmand move it to/usr/local/bin, which is on yourPATH. For example (on macOS):mv avm-darwin-amd64 /usr/local/bin/avmRun the following command to install the CLI:
avm installThe command installs the CLI and returns a directory that you need to add to your path, such as
/Users/milton/.avm/bin.If you get an
developer cannot be identified errorwhen trying to run AVM, you must allow AVM to run.Show me how to allow AVM to run.
On macOS, go to System Preferences > Security & Privacy > General and click Allow Anyway.
For more information, see the macOS documentation about how to open a Mac app from an unidentified developer.
Add the directory that AVM returned when you ran
avm installto your path.Show me how to add the directory.
You can either add the path directly to
/etc/pathsor add it to your shell profile. The following steps describe how to add it to your shell profile:Edit the resource file for your shell, such as
.bashrc,.bash_profile, or .zshrc. For example:vi ~/.bashrcIn the file, find the line for the
PATHthat your resource file exports. They follow the formatexport PATH=$HOME/bin:/usr/local/bin:$PATH.Insert the path provided by AVM (such as
/Users/brianle/.avm/bin) before the ending$PATH. The line should look similar to this:export PATH=$HOME/bin:/usr/local/bin::/Users/milton/.avm/bin:$PATHSave the file.
Reload your terminal, open a new session, or
sourceyour terminal profile file (for example,source .bash_profile).
Run the following command to verify that the CLI is installed:
armoryThe command returns basic information about the CLI, including available commands.
For the AVM or the CLI, you can use the -h flag for more information about specific commands.
Armory provides the CD-as-a-Service CLI as a Docker image.
docker pull armory/armory-cli
Download the latest armory-cli Windows executable from the repo Releases page. Install on the machine that has access to your Kubernetes cluster.
Create Client Credentials
Create a new set of Client Credentials for the Remote Network Agents. Name the credentials “tutorial-blue-green”.
- Access the CD-as-a-Service Console.
- Go to the Configuration tab.
- If you have more than one tenant, make sure you select the desired tenant in the User context menu.
- In the left navigation menu, select Access Management > Client Credentials.
- In the upper right corner, select New Credential.
- Create a credential for your RNA. Use a descriptive name for the credential that matches what it is being used for. For example, name the credentials the same as the account name you assigned the target deployment cluster if creating a credential for an Remote Network Agent (RNA).
- Select an RBAC role from the Select Roles list. You must assign an RBAC role in order for the credential to access CD-as-a-Service.
- If the credential for is a Remote Network Agent, select Remote Network Agent.
- If you plan to use the credential to deploy from a GitHub Action or similar tool, select Deployments Full Access.
- Note the values for both Client ID and Client Secret. You need these values when configuring the RNA or any other service that you want to grant access to. Make sure to store the secret somewhere safe. You are not shown the value again.
Connect your cluster
In this step, you install an RNA in your Kubernetes cluster.
The commands do the following:
- Create an
armory-rnanamespace for the RNA. - Create a Kubernetes secret called
rna-client-credentialsfor your Client Credentials. - Install the RNA into your cluster. The RNA’s
agentIdentifieris “sample-cluster”. You use this identifier in your deployment config file.
Before you begin
- You have Client Credentials (Client Secret and Client ID)
- You are connected to the Kubernetes cluster where you want to install the RNA.
Install
This script installs the RNA into Namespace armory-rna with Agent Identifier sample-cluster.
Replace <client-secret> and <client-id> with your Client Secret and Client ID.
kubectl create ns armory-rna;
kubectl --namespace armory-rna create secret generic rna-client-credentials \
--type=string \
--from-literal=client-secret="<client-secret>" \
--from-literal=client-id="<client-id>";
kubectl apply -f "https://api.cloud.armory.io/kubernetes/agent/manifest?agentIdentifier=sample-cluster&namespace=armory-rna"
Clone the repo branch
Clone the docs-cdaas-sample repo’s tutorial-blue-green branch so you have the code for this tutorial.
git clone --branch tutorial-blue-green --single-branch https://github.com/armory/docs-cdaas-sample.git
Explore the app v1 deployment files
Now that you have cloned the branch, you can explore the files you use to deploy the first version of the potato-facts app, which Armory’s engineers created for CD-as-a-Service demos.
Manifests
You can find the Kubernetes app manifests in the manifests folder of the tutorial-blue-green directory.
potato-facts-v1.yaml: Defines the Deployment object for the potato-facts app, which is a basic web app that displays facts about potatoes.potato-facts-service.yaml: Defines thepotato-facts-svcService object, which sends traffic to the current version of your app. You use this intrafficManagement.kubernetes.activeServicefield in the deployment config file.
Additionally, there are two manifests for creating staging and prod namespaces, so that this tutorial can simulate deploying to different clusters.
Deployment config
Strategy
At the tutorial-blue-green directory root level is the deployment config file (deploy-v1.yaml), where you declare your deployment outcome. App v1 deployment uses a canary strategy called rolling to deploy 100% of the app. If you create a blue/green strategy for app v1 deployment, CD-as-a-Service ignores the strategy and instead deploys 100% of your app to the target because there is only one version of the app.
strategies:
  rolling:
    canary:
      steps:
        - setWeight:
            weight: 100
Deployment targets
Next, looking at the targets section, you see two targets: staging and prod.
targets:
  staging:
    account: sample-cluster
    namespace: potato-facts-staging
    strategy: rolling
  prod:
    account: sample-cluster
    namespace: potato-facts-prod
    strategy: rolling
    constraints:
      dependsOn: ["staging"]
target.staging:
account:sample-clusterdeclares the Remote Network Agent associated with thestagingenvironment.sample-clusteris theagentIdentifierused when you installed the RNA in your cluster in the Connect your cluster step . If you are using an RNA installed outside of this tutorial, be sure to update theaccountfield with your RNA’sagentIdentifier.namespace:potato-facts-stagingis the namespace defined in themanifests/staging-namespace.yamlfile. This simulates deploying to a staging cluster.strategy:rollingis the strategy name declared in thestrategiestop-level section.
target.prod:
account:sample-clusterdeclares the Remote Network Agent associated with thestagingenvironment.sample-clusteris the Agent Identifier used when you installed the RNA in your cluster. In a real world deployment, you would have a different Remote Network Agent installed in your production cluster. If you are using an RNA installed outside of this tutorial, be sure to update theaccountfield with your RNA’sagentIdentifier.namespace:potato-facts-prodis the namespace defined in themanifests/prod-namespace.yamlfile. This simulates deploying to a prod cluster.strategy:rollingis the strategy name declared in thestrategiestop-level section.constraints.dependsOn: This constraint means that the deployment to prod depends upon successful completion of deployment to staging. If staging deployment fails, CD-as-a-Service does not deploy the app to prod. The entire deployment fails.
App manifests
This section declares the paths to the Kubernetes manifests that CD-as-a-Service deploys. Note that the staging-namespace.yaml file has a target constraint, as does the prod-namespace.yaml file. CD-as-a-Service deploys those manifests to only the specified deployment target.
manifests:
  - path: manifests/potato-facts-v1.yaml
  - path: manifests/potato-facts-service.yaml
  - path: manifests/staging-namespace.yaml
    targets: ["staging"]
  - path: manifests/prod-namespace.yaml
    targets: ["prod"]
Active service
Finally, the trafficManagement.kubernetes.activeService field declares the app’s active Service, which is defined in manifests/potato-facts-service.yaml.
trafficManagement:
  - targets: ["staging", "prod"]
    kubernetes:
      - activeService: potato-facts-svc
Deploy v1
You deploy using the CLI, so be sure to log in:
armory login
Confirm the device code in your browser when prompted.
Next, from the root of tutorial-blue-green, deploy the app:
armory deploy start -f deploy-v1.yaml
You can use the link provided by the CLI to observe your deployment’s progression in the CD-as-a-Service Console. CD-as-a-Service deploys your resources to staging. Once those resources have deployed successfully, CD-as-a-Service deploys to prod.
Explore the app v2 deployment files
Manifests
potato-facts-v2.yaml: Links to the second version of the app.potato-facts-service.yaml: No changes.potato-facts-preview-service.yaml: Defines apotato-facts-preview-svcService object that points to the new version of your app. You can programmatically or manually observe the new version before exposing it to traffic via theactiveService. You configure the preview Service in thetrafficManagement.kubernetes.previewServicefield in the deployment config file.
Deployment config
The deploy-v2.yaml config file defines a blue/green strategy called blue-green-prod.
Strategy
strategies:
  rolling:
    canary:
      steps:
        - setWeight:
            weight: 100
  blue-green-prod:
    blueGreen:
      redirectTrafficAfter:
        - pause:
            untilApproved: true
            approvalExpiration:
              duration: 10
              unit: minutes
        - exposeServices:
            services:
              - potato-facts-preview-svc
            ttl:
              duration: 10
              unit: minutes
      shutDownOldVersionAfter:
        - pause:
            duration: 15
            unit: minutes
blueGreen.redirectTrafficAfter: This step declares conditions for exposing the new app version to the active Service. CD-as-a-Service executes steps in parallel.pause: This step pauses for manual judgment before redirecting traffic to the new app version and has an expiration configured. If you do not approve within the specified time, the deployment fails. You can also configure the deployment to pause for a set amount of time before automatically continuing deployment.exposeServices: This step creates a temporary preview service link for testing purposes. The exposed link is not secure and expires after the time in thettlsection. See Configure a Temporary Preview Link to a Deployed Service for details.
The
redirectTrafficAfterfield also supports continuing or rolling back based on canary analysis. See the Strategies config file reference for details.blueGreen.shutDownOldVersionAfter: This step defines a condition for deleting the old version of your app. If deployment is successful, CD-as-a-Service shuts down the old version after the specified time. This field supports the samepausesteps as theredirectTrafficAfterfield.
Deployment targets
The staging configuration is the same, but the prod configuration strategy has changed to blue-green-prod.
targets:
  staging:
    account: sample-cluster
    namespace: potato-facts-staging
    strategy: rolling
  prod:
    account: sample-cluster
    namespace: potato-facts-prod
    strategy: blue-green-prod
    constraints:
      dependsOn: ["staging"]
      beforeDeployment:
        - pause:
            untilApproved: true
App manifests
This section has also changed slightly. In addition to specifying the second version of the app (potato-facts-v2.yaml), the section contains potato-facts-service-preview.yaml, which is the preview Service for the new version of the app.
manifests:
  - path: manifests/potato-facts-v2.yaml
  - path: manifests/potato-facts-service.yaml
  - path: manifests/potato-facts-service-preview.yaml
  - path: manifests/staging-namespace.yaml
    targets: ["staging"]
  - path: manifests/prod-namespace.yaml
    targets: ["prod"]
Active and preview services
Finally, the trafficManagement.kubernetes field declares the preview Service, which is defined in manifests/potato-facts-service-preview.yaml.
trafficManagement:
  - targets: ["staging", "prod"]
    kubernetes:
      - activeService: potato-facts-svc
      - previewService: potato-facts-preview-svc
Deploy v2
armory deploy start -f deploy-v2.yaml
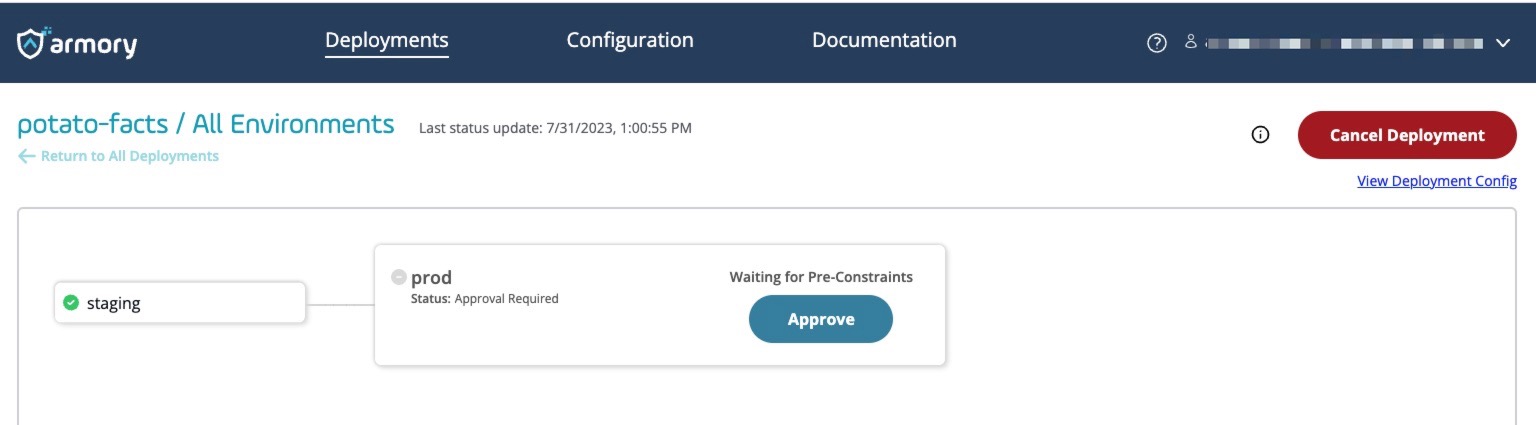
Use the link provided by the CLI to navigate to your deployment in the CD-as-a-Service Console. Once the staging deployment has completed, click Approve to allow the prod deployment to begin.
Once deployment begins, click the prod deployment node to open the details window.
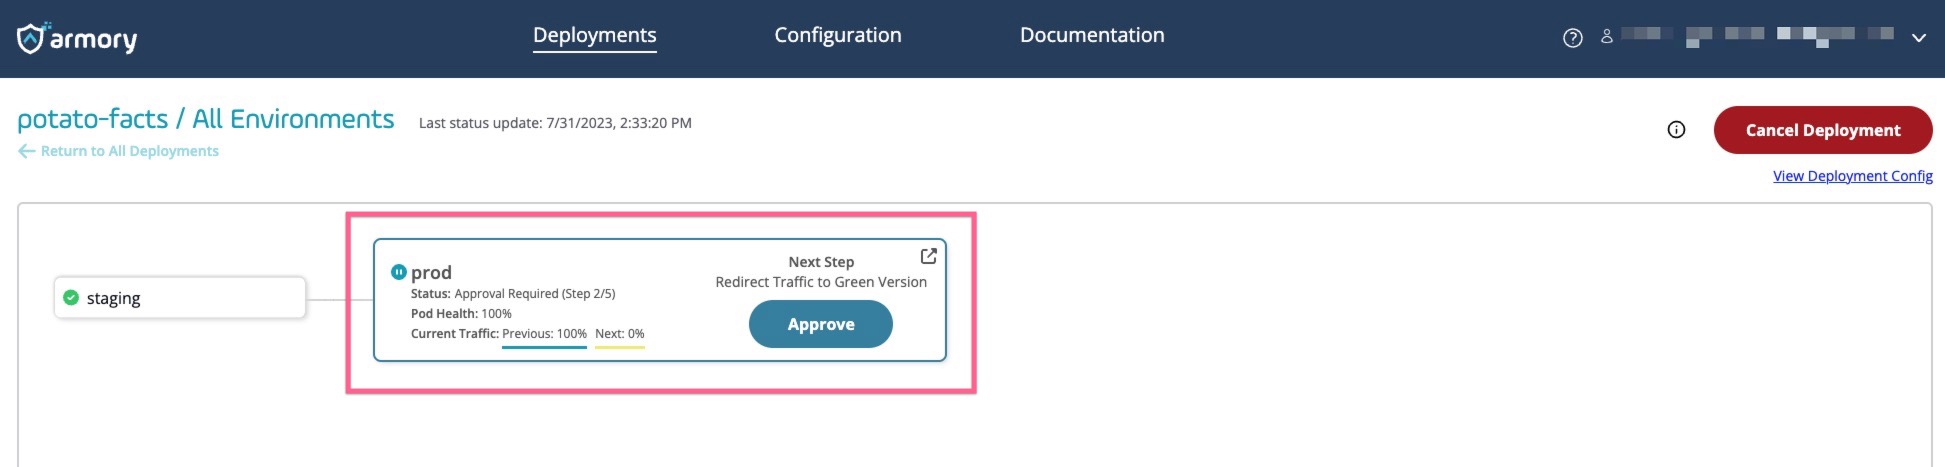
You can see that both the previous version (blue) and new version (green) are running.
In the Next Version section, click View Environment to open the preview link to the green version of the app. You can also find the link in the Resources section.
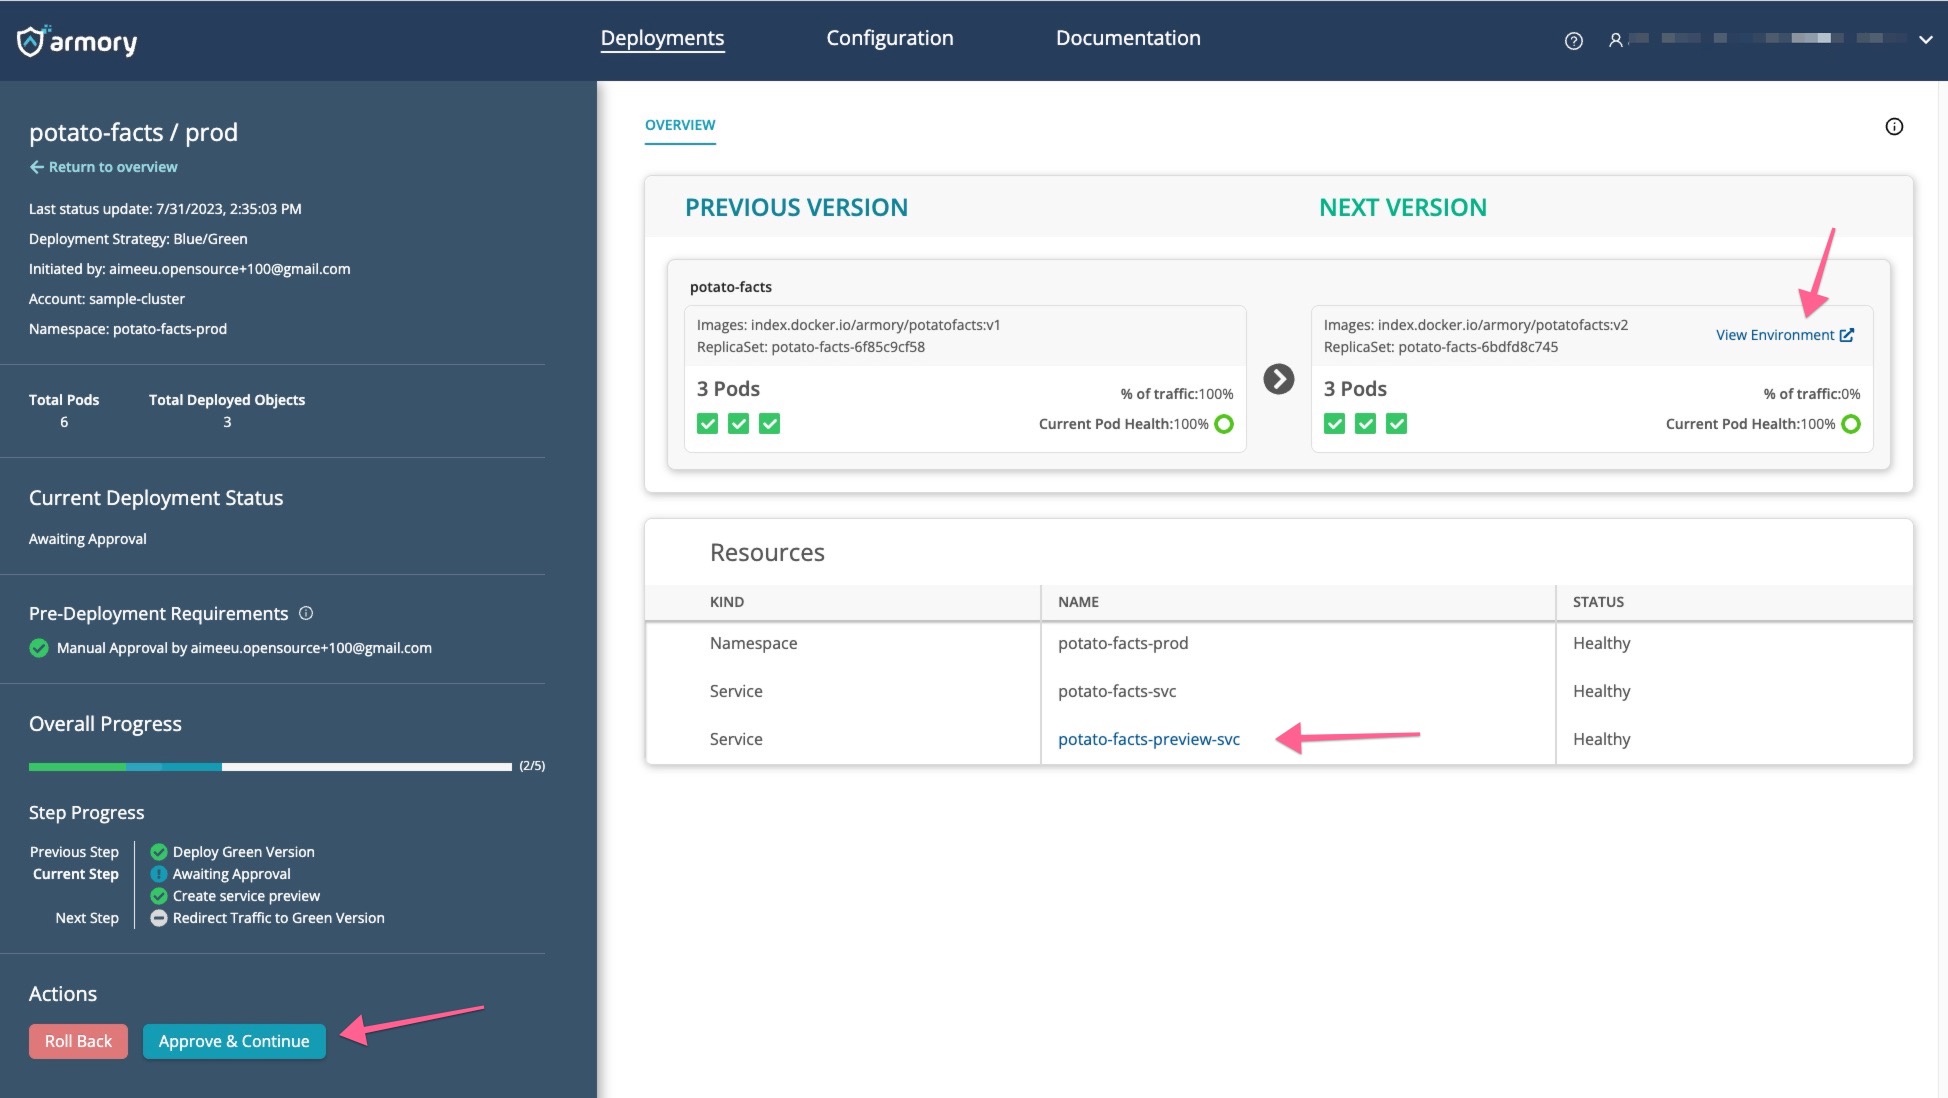
After you have verified the new app version, you can click Approve & Continue to redirect all traffic to the new version.
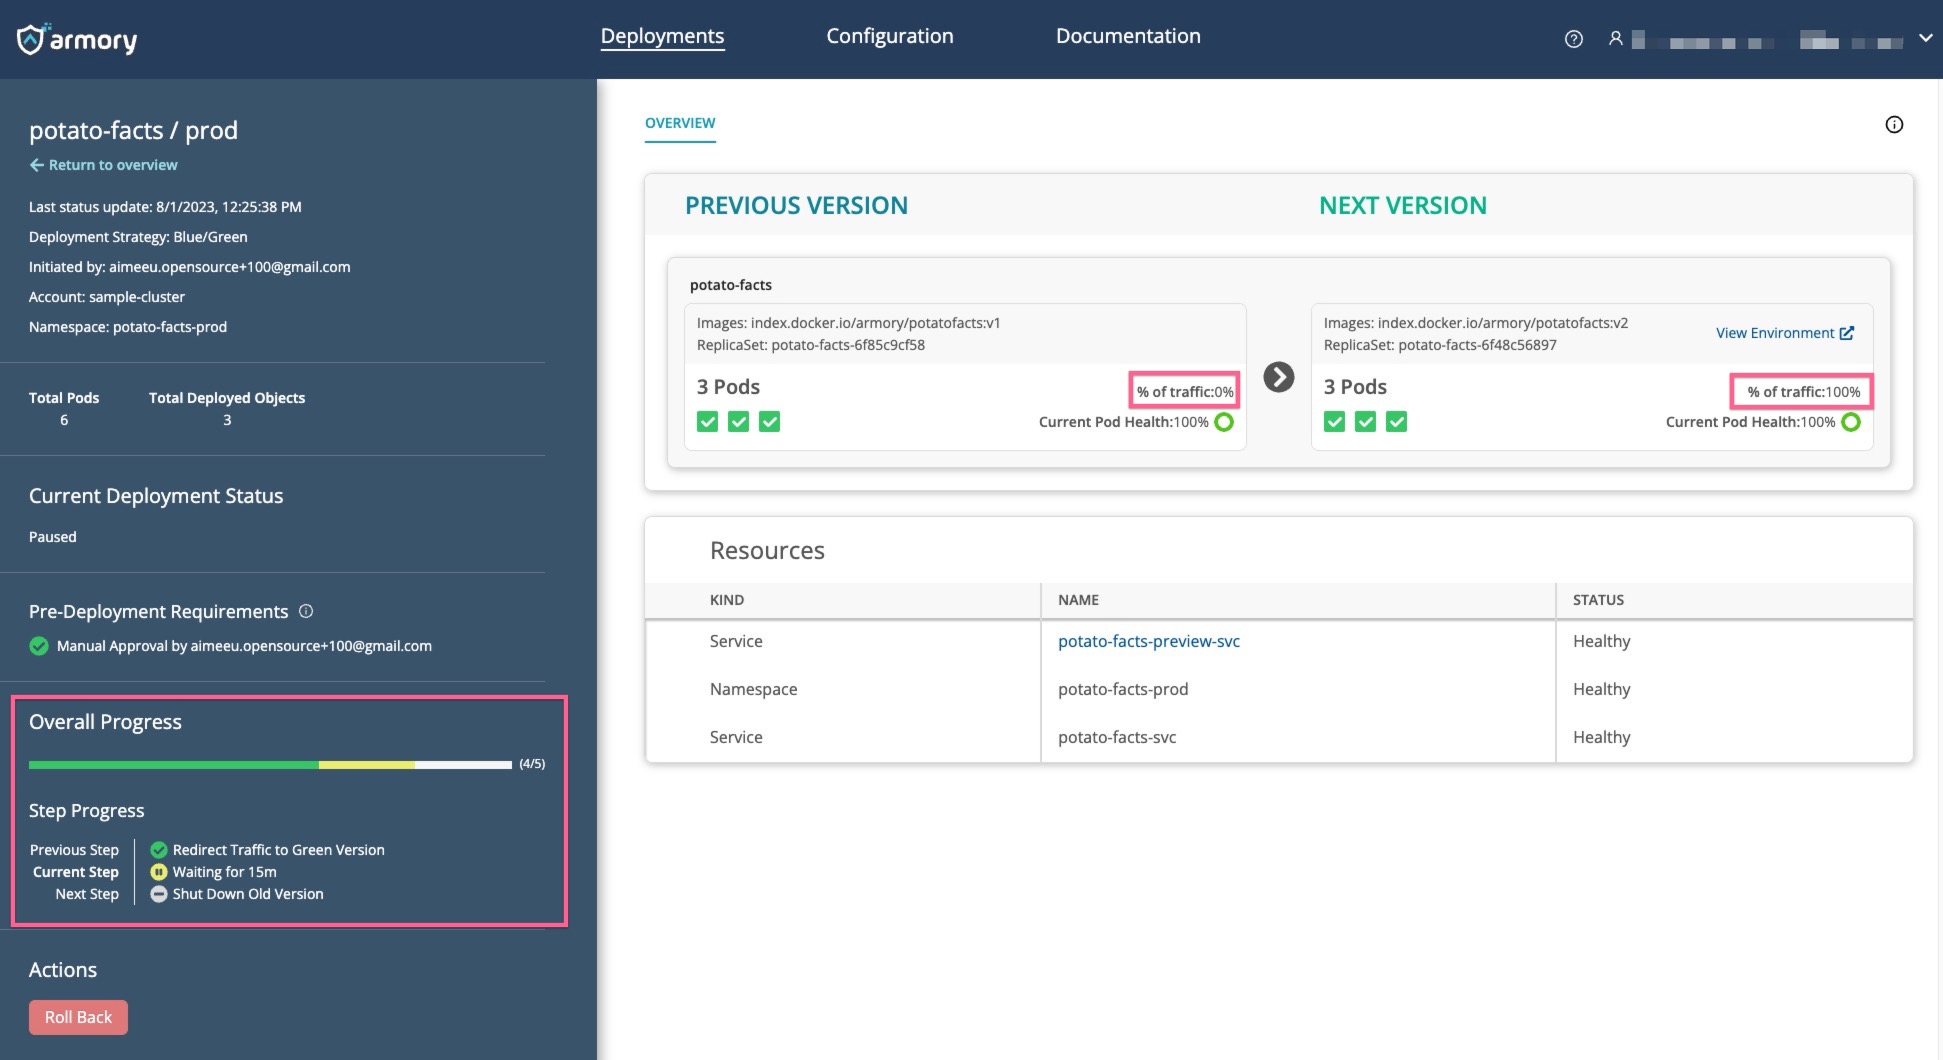
The last step is shutting down the old version. Note that you can roll back until the old version has been shut down.
Clean up
You can use kubectl to remove the app resources you created:
kubectl delete ns potato-facts-staging potato-facts-prod
To remove the Remote Network Agent resources you installed:
kubectl delete ns armory-rna
What’s next
Feedback
Was this page helpful?
Thank you for letting us know!
Sorry to hear that. Please tell us how we can improve.
Last modified October 31, 2023: (f370fe9)