Armory CD-as-a-Service Plugin for Spinnaker and Armory Continuous Deployment
The Armory Continuous Deployment-as-a-Service plugin enables performing canary and blue/green deployments in a single stage from Spinnaker to your Kubernetes deployment target using CD-as-a-Service.
Overview of the CD-as-a-Service Spinnaker plugin
The Armory Continuous Deployment-as-a-Service Plugin for Spinnaker™ adds new stages to your Armory CD or Spinnaker instance. When you use one of these stages to deploy an app, you can configure how to deploy the stage incrementally by setting percentage thresholds for the deployment. For example, you can deploy the new version of your app to 25% of your target cluster and then wait for a manual judgement or a configurable amount of time. This wait gives you time to assess the impact of your changes. From there, either continue the deployment to the next threshold you set or roll back the deployment.
Objectives
Meet the prerequisites specified in the Before you begin section.
You may have to log in after creating your account.
The Welcome to Continuous Deployment-as-a-ServiceConfiguration page lists the steps you need to complete to begin using Armory CD-as-a-Service.
Networking
Your Spinnaker instance and the cluster(s) where you install the CD-as-a-Service Remote Network Agent(s) need specific ports open.
The following network endpoints are used for communication into Armory CD-as-a-Service:
DNS
Port
Protocol
Description
agent-hub.cloud.armory.io
443
TLS enabled gRPC over HTTP/2 TLS version 1.2
Remote Network Agent Hub connection; Agent Hub relays network traffic to privately networked resources such as Kubernetes APIs, Jenkins, or Prometheus, through Remote Network Agent (RNA) connections. Agent Hub does not require direct network access to the RNAs since they connect to Agent Hub through an encrypted, long-lived gRPC HTTP/2 connection.
api.cloud.armory.io
443
HTTP over TLS (HTTPS) TLS version 1.2
Armory REST API; Clients connect to these APIs to interact with Armory CD-as-a-Service.
auth.cloud.armory.io
443
HTTP over TLS (HTTPS) TLS version 1.2
OIDC Service; The Open ID Connect (OIDC) service is used to authorize and authenticate machines and users. The Remote Network Agents, Armory Continuous Deployment (Spinnaker) plugin, and other services all authenticate against this endpoint. The service provides an identity token that can be passed to the Armory API and Agent Hub.
console.cloud.armory.io
443
HTTP over TLS (HTTPS) TLS version 1.2
Cloud Console; The browser-based UI for Armory CD-as-a-Service
*.preview.cloud.armory.io
443
HTTP over TLS (HTTPS) TLS version 1.2
Preview Service; Creates a temporary public preview link to deployed services for testing; routes traffic to exposed services through Agent Hub plus Remote Network Agents.
All network traffic is encrypted while in transit.
Encryption in transit is over HTTPS using TLS encryption. When using Armory-provided software for both the client and server, these connections are secured by TLS 1.2. Certain APIs support older TLS versions for clients that do not support 1.2.
Encryption at rest uses AES256 encryption.
Additionally, your Armory CD instance needs access to GitHub to download the plugin during installation.
Target Kubernetes cluster
The Spinnaker plugin does not use Clouddriver to source its accounts. Instead, it uses Remote Network Agents (RNAs) that are deployed in your target Kubernetes clusters. An RNA is a lightweight, scalable service that enables the Spinnaker plugin to interact with your infrastructure. You must install RNAs in every target cluster.
Register your Armory CD environment so that it can communicate with Armory services. Each environment needs to get registered if you, for example, have production and development environments.
In the CD-as-a-Service Console, go to the Access Management > Client Credentials screen. Click the New Credential button. On the Create New Client Credential screen:
Name: enter a meaningful name for your Spinnaker instance
Select Roles: select Deployments Full Access
Click Create Credential. Copy the Client ID and Client Secret values for use in the Install the plugin section.
If you have more than one tenant, make sure you select the desired tenant in the User context menu.
In the left navigation menu, select Access Management > Client Credentials.
In the upper right corner, select New Credential.
Create a credential for your RNA. Use a descriptive name for the credential that matches what it is being used for. For example, name the credentials the same as the account name you assigned the target deployment cluster if creating a credential for an Remote Network Agent (RNA).
Select an RBAC role from the Select Roles list. You must assign an RBAC role in order for the credential to access CD-as-a-Service.
If the credential for is a Remote Network Agent, select Remote Network Agent.
If you plan to use the credential to deploy from a GitHub Action or similar tool, select Deployments Full Access.
Note the values for both Client ID and Client Secret. You need these values when configuring the RNA or any other service that you want to grant access to. Make sure to store the secret somewhere safe. You are not shown the value again.
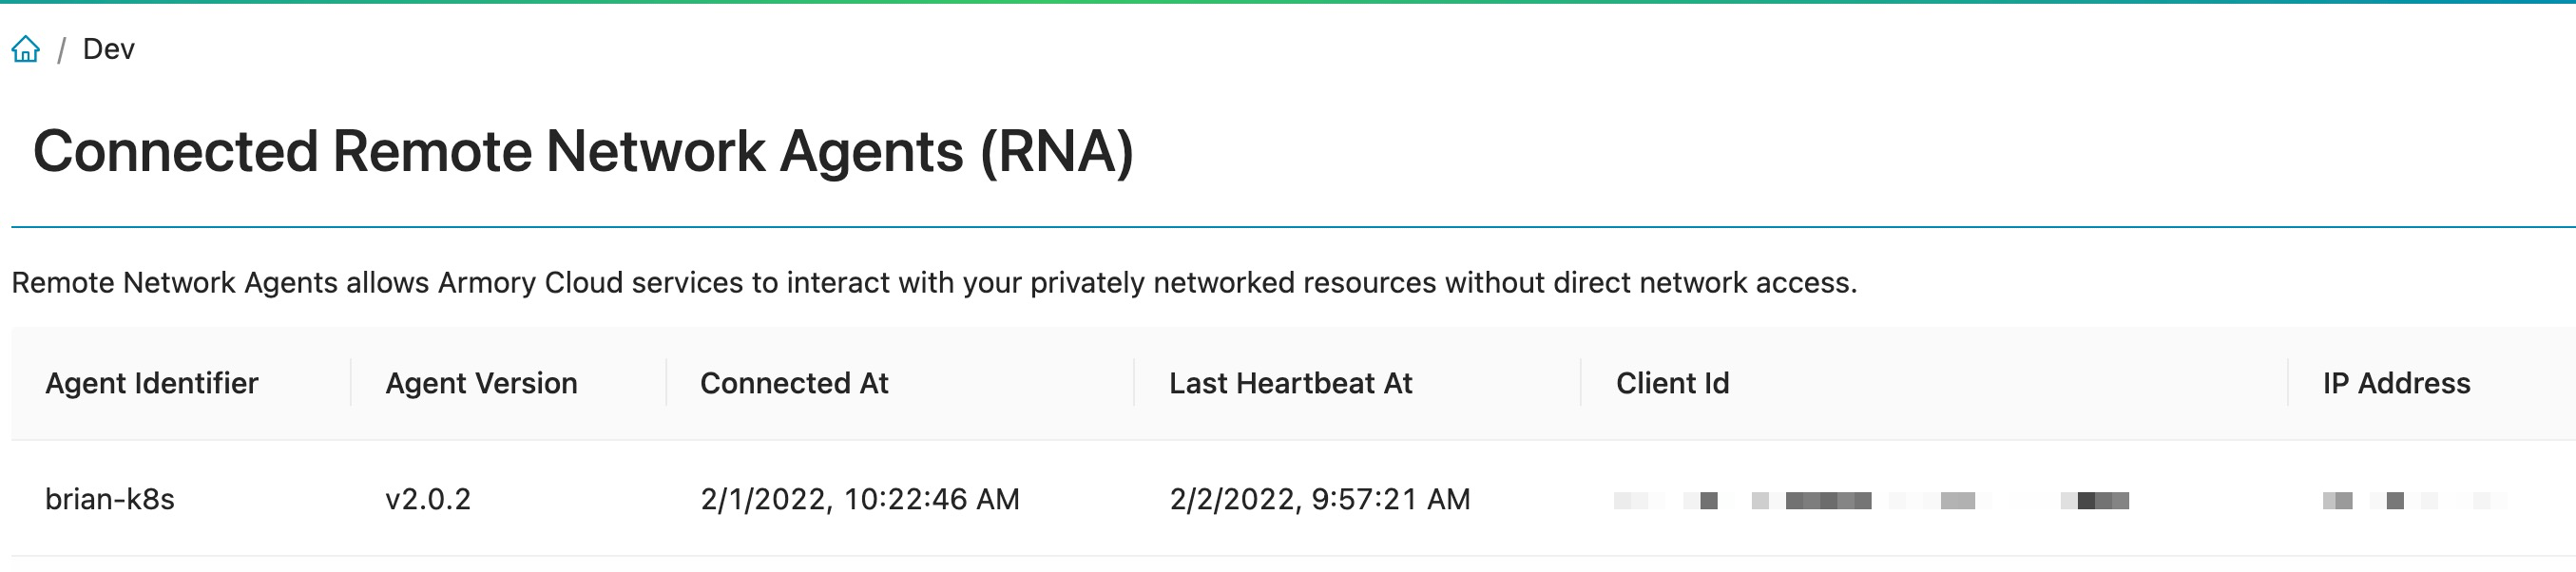
Go to the Agents page in the Configuration UI and verify the connection. If you do not see your cluster, verify that you are in the correct CD-as-a-Service tenant.
Note that you may see a “No Data message” when first loading the Agent page.
If you do not see the RNA for your target deployment cluster, check the logs for the target deployment cluster to see if the RNA is up and running.
You should see messages similar to the following that show your client ID and your account getting registered in Armory CD-as-a-Service:
You can configure Spinnaker secrets as outlined in the Work with Secrets in Spinnaker guide. This means you can set the Client Secret value a secret token instead of the plain text value.
If you are running Armory CD 2.26.3, armory.cloud block goes in a different location. Instead of spec.spinnakerConfig.spinnaker, the block needs to go under both spec.spinnakerConfig.gate and spec.spinnakerConfig.orca. For more information see Known issues. Additionally there is a plugins block that needs to be added.
The installation instructions using the Operator are the same except for where the armory.cloud and this plugins block go.
In your Kustomize patches directory, create a file named patch-plugin-deployment.yml and add the following manifest to it.
#patch-plugin-deployment.ymlapiVersion: spinnaker.armory.io/v1alpha2
kind: SpinnakerService
metadata:
name: spinnaker
namespace: <namespace>
spec:
spinnakerConfig:
profiles:
gate:
spinnaker:
extensibility:
# This snippet is necessary so that Gate can serve your plugin code to Deckdeck-proxy:
enabled: trueplugins:
Armory.Deployments:
enabled: trueversion: <Latest-version> # Replace this with the latest version from: https://github.com/armory-plugins/armory-deployment-plugin-releases/releases/
repositories:
armory-deployment-plugin-releases:
enabled: trueurl: https://raw.githubusercontent.com/armory-plugins/armory-deployment-plugin-releases/master/repositories.json
# Global Settingsspinnaker:
armory.cloud:
enabled: trueiam:
clientId: <clientId for Spinnaker from earlier>
clientSecret: <clientSecret for Spinnaker from earlier>
tokenIssuerUrl: https://auth.cloud.armory.io/oauth/token
api:
baseUrl: https://api.cloud.armory.io
spinnaker:
extensibility:
plugins:
Armory.Deployments:
enabled: trueversion: <Latest-version> # Replace this with the latest version from: https://github.com/armory-plugins/armory-deployment-plugin-releases/releases/
repositories:
armory-deployment-plugin-releases:
url: https://raw.githubusercontent.com/armory-plugins/armory-deployment-plugin-releases/master/repositories.json
Then, include the file under the patchesStrategicMerge section of your kustomization file:
If you are running Armory CD 2.26.3, armory.cloud block needs to go in gate-local.yml and orca-local.yml instead of spinnaker-local.yml. For more information see Known issues. Other than the change in location, the installation instructions remain the same.
In the /.hal/default/profiles directory, add the following configuration to spinnaker-local.yml. If the file does not exist, create it and add the configuration.
#spinnaker-local.ymlarmory.cloud:
enabled: trueiam:
clientId: <clientId for Spinnaker from earlier>
clientSecret: <clientSecret for Spinnaker from earlier>
tokenIssuerUrl: https://auth.cloud.armory.io/oauth/token
api:
baseUrl: https://api.cloud.armory.io
spinnaker:
extensibility:
plugins:
Armory.Deployments:
enabled: trueversion: <Latest-version> # Replace this with the latest version from: https://github.com/armory-plugins/armory-deployment-plugin-releases/releases/
repositories:
armory-deployment-plugin-releases:
url: https://raw.githubusercontent.com/armory-plugins/armory-deployment-plugin-releases/master/repositories.json
In the /.hal/default/profiles directory, add the following configuration to gate-local.yml. If the file does not exist, create it and add the configuration.
#gate-local.ymlspinnaker:
extensibility:
# This snippet is necessary so that Gate can serve your plugin code to Deckdeck-proxy:
enabled: trueplugins:
Armory.Deployments:
enabled: trueversion: <Latest-version> # Replace this with the latest version from: https://github.com/armory-plugins/armory-deployment-plugin-releases/releases/
repositories:
armory-deployment-plugin-releases:
enabled: trueurl: https://raw.githubusercontent.com/armory-plugins/armory-deployment-plugin-releases/master/repositories.json
Apply the changes to your Armory CD instance.
hal deploy apply
Verify that the plugin is configured
Check that all the services are up and running:
kubectl -n <Armory-CD-namespace> get pods
Navigate to the Armory CD UI.
In a new or existing application, create a new pipeline.
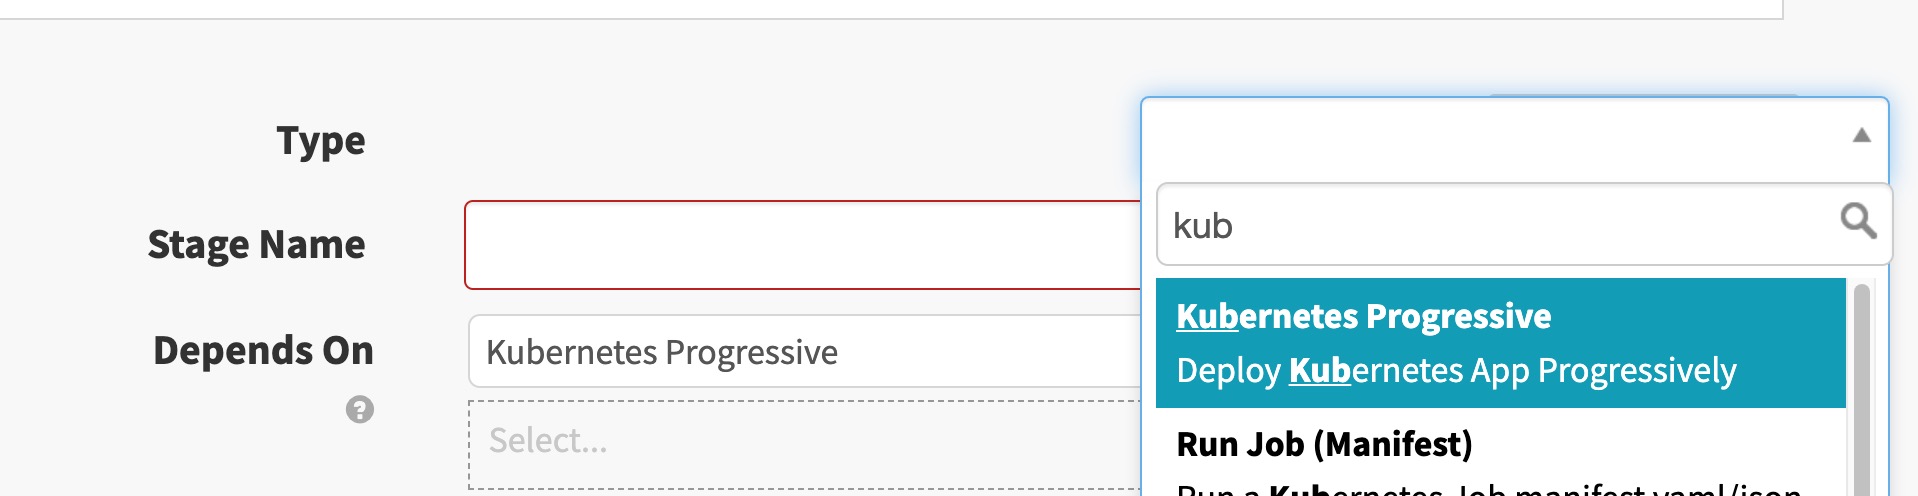
In this pipeline, select Add stage and search for Kubernetes Progressive. The stage should appear if the plugin is properly configured.
In the Basic Settings section, verify that you can see the target deployment account in the Account dropdown.
.
Use the plugin
The plugin provides the following pipeline stages that you can use to deploy your app:
Borealis Progressive Deployment YAML: You create the Armory CD-as-a-Service deployment YAML configuration, so you have access to the full set of options for deploying your app to a single environment.
Kubernetes Progressive: This is a basic deployment stage with a limited set of options. Blue/green deployment is not supported in Early Access.
This stage only supports deploying to a single environment.
This stage uses YAML deployment configuration to deploy your app. The YAML that you create must be in the same format as the Deployment Config File that you would use with the Armory CD-as-a-Service CLI.
You have the following options for adding your Armory CD-as-a-Service deployment YAML configuration:
Text: You create and store your deployment YAML within Armory CD.
Artifact: You store your deployment YAML file in source control.
Before you begin
Add the Kubernetes manifest for your app as a pipeline artifact in the Configuration section of your pipeline. Or you can generate it using the ‘Bake (Manifest)’ stage, as you would for a standard Kubernetes deployment in Armory CD.
Prepare your Armory CD-as-a-Service deployment YAML. You can use the Armory CD-as-a-Service CLI to generate a deployment config file template. In your deployment YAML manifests.path section, you have to specify the file name of the app’s Kubernetes manifest artifact, which may vary from the Display Name on the Expected Artifact screen.
Configure the stage
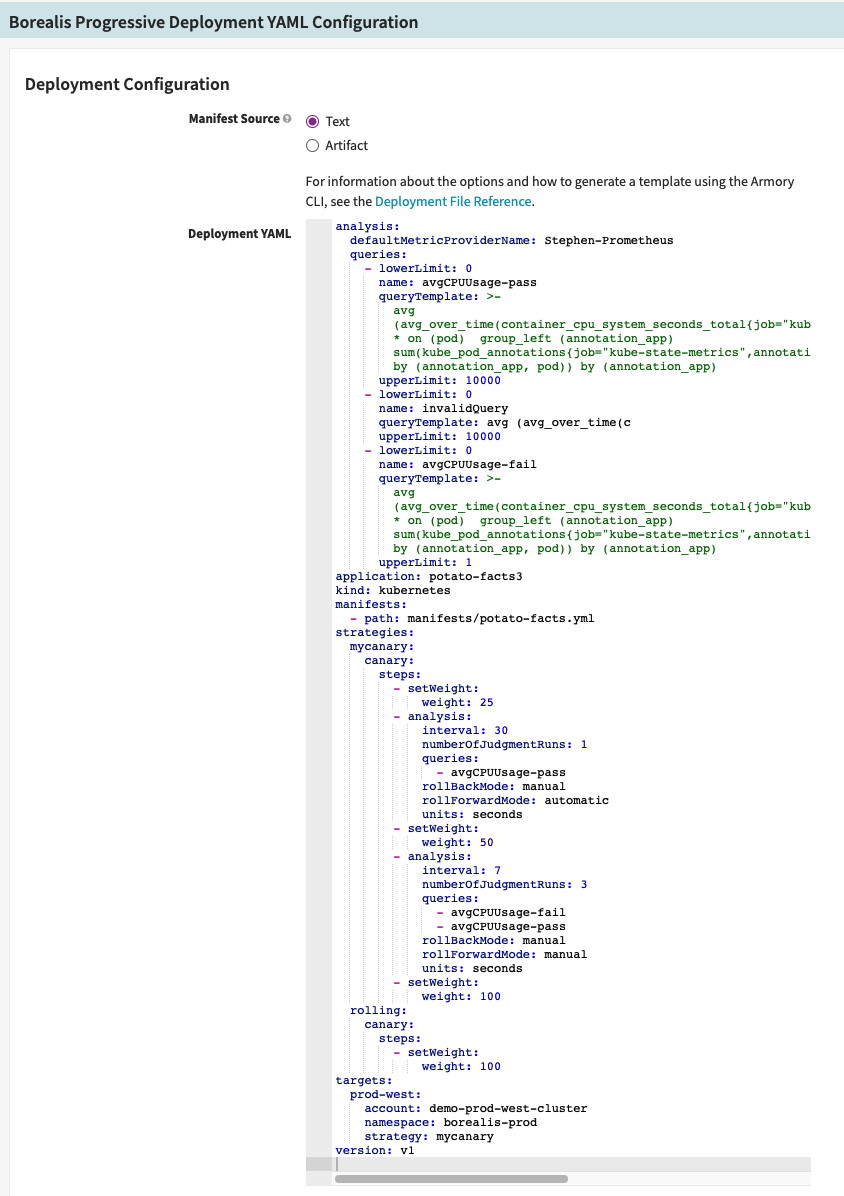
The Deployment Configuration section is where you define your Armory CD-as-a-Service progressive deployment and consists of manifest source and required artifacts to bind.
Manifest source
Choose Text for the Manifest Source.
Paste your deployment file YAML into the Deployment YAML text box. For example:
Before you select Artifact, make sure you have added your Armory CD-as-a-Service deployment file as a pipeline artifact.
Select Artifact as the Manifest Source.
Select your Armory CD-as-a-Service deployment file from the Manifest Artifact drop down list.
Required artifacts to bind
For each manifest you list in the manifests.path section of your Armory CD-as-a-Service deployment file, you must bind the artifact to the stage.
Then you must bind potato-facts.yml as a required artifact:
Kubernetes Progressive stage
If you have deployed Kubernetes apps before using Armory CD, this page may look familiar. The key difference between a Kubernetes deployment using Armory CD and Armory CD with the Armory CD-as-a-Service Spinnaker Plugin is in the How to Deploy section.
The How to Deploy section is where you define your progressive deployment and consists of two parts:
Strategy
This is the deployment strategy you want to use to deploy your Kubernetes app. As part of the early access program, the Canary strategy is available. Canary deployments allow you to roll out changes to a predefined percentage of your cluster and increment from there as you monitor the effects of your changes. If something doesn’t look quite right, you can initiate a rollback to a previous known good state.
Steps
These settings control how the your Kubernetes deployment behaves as Armory CD-as-a-Service deploys it. You can tune two separate but related characteristics of the deployment:
Rollout Ratio: set the percentage threshold (integer) for how widely an app should get rolled out before pausing.
Then wait: define what triggers the rollout to continue. The trigger can either be a manual approval (until approved) or for a set amount of time, either seconds, minutes or hours (integer).
Create a step for each Rollout Ratio you want to define. For example, if you want a deployment to pause at 25%, 50%, and 75% of the app rollout, you need to define 3 steps, one for each of those thresholds. The steps have independent Then wait behaviors and can be set to all follow the same behavior or different ones.
Try out the stage
You can try out the Kubernetes Progressive stage using either the hello-world sample manifest described below or an artifact that you have. The hello-world example deploys NGINX that intentionally takes longer than usual for demonstration purposes.
Perform the following steps:
In the Armory CD UI, select an existing app or create a new one.
Create a new pipeline.
Add a stage to your pipeline with the following attributes:
Type: select Kubernetes Progressive
Stage Name: provide a descriptive name or use the autogenerated name.
In the Account field, select the target Kubernetes cluster you want to deploy to. This is a cluster where the Remote Network Agent is installed
For Manifest Source, ensure that you select your manifest source. If you are using the hello-world sample manifest described later, select Text.
Using text as the manifest source:
In the Manifest field, provide your manifest. If you are using the hello-world manifest, enter that manifest.
Show me the hello-world manifest
# A simple nginx deployment with an init container that causes deployment to take longer than usualapiVersion: apps/v1
kind: Deployment
metadata:
name: demo-app
spec:
replicas: 10selector:
matchLabels:
app: demo-app
template:
metadata:
labels:
app: demo-app
spec:
containers:
- env:
- name: TEST_ID
value: __TEST_ID_VALUE__
image: 'nginx:1.14.1'name: demo-app
ports:
- containerPort: 80name: http
protocol: TCP
initContainers:
- command:
- sh
- '-c' - sleep 10
image: 'busybox:stable'name: sleep
Using an existing artifact
Select an existing artifact or define a new one as you would for a standard Kubernetes deployment in Armory CD.
In the How to Deploy section, configure the Rollout Ratio and Then wait attributes for the deployment.
Optionally, add more steps to the deployment to configure the rollout behavior. You do not need to create a step for 100% Rollout Ratio. Armory CD-as-a-Service automatically scales the deployment to 100% after the final step you configure.
Save the pipeline.
Trigger a manual execution of the pipeline.
On the Pipelines page of the Armory CD UI, select the pipeline and watch the deployment progress. If you set the Then wait behavior of any step to until approved, this is where you approve the rollout and allow it to continue. After completing the final step you configured, Armory CD-as-a-Service scales the deployment to 100% of the cluster if needed.
Known issues and limitations
Manifest limitations
Armory CD-as-a-Service has the following constraints when deploying a manifest:
Deploying ReplicaSets is not supported.
Deploying Pods is not supported.
armory.cloud block location
In Armory CD 2.26.3, the location of where you put the armory.cloud config block is different from other versions. Additionally, there is an additional config block for spec.spinnakerConfig.profiles.gate.spinnaker.extensibility that contains information for the plugin named plugins.
Your Kustomize patch file should resemble the following where armory.cloud is a child of the gate and orca blocks instead of a spinnaker block:
#patch-plugin-deployment.ymlapiVersion: spinnaker.armory.io/v1alpha2
kind: SpinnakerService
metadata:
name: spinnaker
namespace: <namespace>
spec:
spinnakerConfig:
profiles:
gate:
spinnaker:
extensibility:
# This snippet is necessary so that Gate can serve your plugin code to Deckdeck-proxy:
enabled: trueplugins:
Armory.Deployments:
enabled: trueversion: <Latest-version> # Replace this with the latest version from: https://github.com/armory-plugins/armory-deployment-plugin-releases/releases/
plugins:
Armory.Deployments:
enabled: trueversion: <Latest-version> # Replace this with the latest versionrepositories:
armory-deployment-plugin-releases:
enabled: trueurl: https://raw.githubusercontent.com/armory-plugins/armory-deployment-plugin-releases/master/repositories.json
# Note how armory.cloud is a child of gate instead of spinnakerarmory.cloud:
enabled: trueiam:
clientId: <clientId for Spinnaker from earlier>
clientSecret: <clientSecret for Spinnaker from earlier>
tokenIssuerUrl: https://auth.cloud.armory.io/oauth/token
api:
baseUrl: https://api.cloud.armory.io
# Note how armory.cloud is a child of orca instead of spinnakerorca:
armory.cloud:
enabled: trueiam:
clientId: <clientId for Spinnaker from earlier>
clientSecret: <clientSecret for Spinnaker from earlier>
tokenIssuerUrl: https://auth.cloud.armory.io/oauth/token
api:
baseUrl: https://api.cloud.armory.io
spinnaker:
extensibility:
plugins:
Armory.Deployments:
enabled: trueversion: <Latest-version> # Replace this with the latest version from: https://github.com/armory-plugins/armory-deployment-plugin-releases/releases/
repositories:
armory-deployment-plugin-releases:
url: https://raw.githubusercontent.com/armory-plugins/armory-deployment-plugin-releases/master/repositories.json
Your spinnaker-local.yml file should not have the armory.cloud block anymore and only contain the block to install the plugin:
#spinnaker-local.ymlspinnaker:
extensibility:
plugins:
Armory.Deployments:
enabled: trueversion: <Latest-version> # Replace this with the latest version from: https://github.com/armory-plugins/armory-deployment-plugin-releases/releases/
repositories:
armory-deployment-plugin-releases:
url: https://raw.githubusercontent.com/armory-plugins/armory-deployment-plugin-releases/master/repositories.json
Your gate-local.yml file should include the extensibility and the armory.cloud configurations like the following example:
#gate-local.ymlspinnaker:
extensibility:
plugins:
Armory.Deployments:
enabled: trueversion: <Latest-version> # Replace this with the latest version# This snippet is necessary so that Gate can serve your plugin code to Deckdeck-proxy:
enabled: trueplugins:
Armory.Deployments:
enabled: trueversion: <Latest-version> # Replace this with the latest version from: https://github.com/armory-plugins/armory-deployment-plugin-releases/releases/
repositories:
armory-deployment-plugin-releases:
enabled: trueurl: https://raw.githubusercontent.com/armory-plugins/armory-deployment-plugin-releases/master/repositories.json
armory.cloud:
enabled: trueiam:
clientId: <clientId for Spinnaker from earlier>
clientSecret: <clientSecret for Spinnaker from earlier>
tokenIssuerUrl: https://auth.cloud.armory.io/oauth/token
api:
baseUrl: https://api.cloud.armory.io
Your orca-local.yml file should include the armory.cloud configration like the following:
#orca-local.ymlarmory.cloud:
enabled: trueiam:
clientId: <clientId for Spinnaker from earlier>
clientSecret: <clientSecret for Spinnaker from earlier>
tokenIssuerUrl: https://auth.cloud.armory.io/oauth/token
api:
baseUrl: https://api.cloud.armory.io
This product documentation page is Armory confidential information.