Quickstart
Learning objectives
- Sign up for CD-as-a-Service.
- Install the CD-as-as-Service CLI on your Mac, Linux, or Windows workstation.
- Connect your Kubernetes cluster to CD-as-a-Service.
- Deploy Armory’s sample app
potato-factsto two environments:stagingandprod.- Use the CD-as-a-Service Console to approve an environment promotion.
- Observe a traffic split between two app versions.
- Learn CD-as-a-Service deployment file syntax.
- Remove the resources you created.
Before you begin
- You are familiar with CD-as-a-Service’s key components.
- You have access to a Kubernetes cluster. If you need a cluster, consider installing a local Kind or Minikube cluster. Your cluster’s API endpoint does not need to be publicly accessible to use CD-as-a-Service.
If you do not have a Kubernetes cluster and still wish to tour CD-as-a-Service, you can sign up and select Self-Guided Browser Tour. CD-as-a-Service creates a short-lived Kubernetes cluster for you and then guides you through deploying the sample app.
Sign up for CD-as-a-Service
Access the registration screen to create an account. Fill in the required fields. When you’re done, click Create Account.
When you create your account, CD-as-a-Service does the following:
- Creates an Organization for your company
- Creates a Tenant for the Organization
- Creates a User account with an Organization Admin role for you.
See Identity & Access Management for details.
You may have to log in after creating your account.
The Welcome to Continuous Deployment-as-a-Service Configuration page lists the steps you need to complete to begin using Armory CD-as-a-Service.
Install the CD-as-as-Service CLI
brew tap armory-io/armory
brew install armory-cli
You can install the CLI with a one-line script that does the following:
- Fetches the correct Armory Version Manager binary (
avm) for your operating system - Installs the AVM binary
- Uses the AVM to install the CLI binary (
armory) - Adds the AVM and the CLI to the path in your bash or zsh profile
Execute the following script on the machine that has access to your Kubernetes cluster:
curl -sL go.armory.io/get-cli | bash
After installation completes, you should start a new terminal session or source your profile.
Download the AVM for your operating system and CPU architecture. You can manually download it from the repo or use the following command:
curl -LO https://github.com/armory/avm/releases/latest/download/avm-<os>-<architecture>For example, the following command downloads the latest version for macOS (Darwin):
curl -LO https://github.com/armory/avm/releases/latest/download/avm-darwin-amd64You can see the full list of available releases in the repo.
Give AVM execute permissions. For example (on macOS):
chmod +x avm-darwin-amd64Confirm that
/usr/local/binis on yourPATH:echo $PATHThe command returns your
PATH, which should now include/usr/local/bin/.Rename the AVM binary to
avmand move it to/usr/local/bin, which is on yourPATH. For example (on macOS):mv avm-darwin-amd64 /usr/local/bin/avmRun the following command to install the CLI:
avm installThe command installs the CLI and returns a directory that you need to add to your path, such as
/Users/milton/.avm/bin.If you get an
developer cannot be identified errorwhen trying to run AVM, you must allow AVM to run.Show me how to allow AVM to run.
On macOS, go to System Preferences > Security & Privacy > General and click Allow Anyway.
For more information, see the macOS documentation about how to open a Mac app from an unidentified developer.
Add the directory that AVM returned when you ran
avm installto your path.Show me how to add the directory.
You can either add the path directly to
/etc/pathsor add it to your shell profile. The following steps describe how to add it to your shell profile:Edit the resource file for your shell, such as
.bashrc,.bash_profile, or .zshrc. For example:vi ~/.bashrcIn the file, find the line for the
PATHthat your resource file exports. They follow the formatexport PATH=$HOME/bin:/usr/local/bin:$PATH.Insert the path provided by AVM (such as
/Users/brianle/.avm/bin) before the ending$PATH. The line should look similar to this:export PATH=$HOME/bin:/usr/local/bin::/Users/milton/.avm/bin:$PATHSave the file.
Reload your terminal, open a new session, or
sourceyour terminal profile file (for example,source .bash_profile).
Run the following command to verify that the CLI is installed:
armoryThe command returns basic information about the CLI, including available commands.
For the AVM or the CLI, you can use the -h flag for more information about specific commands.
Armory provides the CD-as-a-Service CLI as a Docker image.
docker pull armory/armory-cli
Download the latest armory-cli Windows executable from the repo Releases page. Install on the machine that has access to your Kubernetes cluster.
Log in with the CLI
armory login
Confirm the device code in your browser when prompted. Then return to this guide.
Connect your cluster
CD-as-a-Service uses an agent to execute deployments in your Kubernetes cluster. The installation process uses credentials from your ~/.kube/config file to install the CD-as-a-Service agent.
Run the following command to install an agent in your Kubernetes cluster:
armory agent create
You name your agent during the installation process. This guide references that name as <my-agent-identifier>.
Deploy the sample app
Armory’s potato-facts sample app is a basic web app. The UI polls the API backend for facts about potatoes and renders them for users.
First deployment
Your first deployment deploys the following resources into your Kubernetes cluster:
- Two namespaces:
potato-facts-stagingandpotato-facts-prod - In each namespace: the
potato-factsapp and a KubernetesService
Deploy
Run the following command:
armory deploy start -f https://go.armory.io/hello-armory-first-deployment --account <my-agent-identifier>
Congratulations, you’ve just started your first deployment with CD-as-a-Service!
You can use the link provided by the CLI to observe your deployment’s progression in the CD-as-a-Service Console. CD-as-a-Service deploys your resources to staging. Once those resources have deployed successfully, CD-as-a-Service deploys to prod.
Second deployment
CD-as-a-Service is designed to help you build safety into your app deployment process. It does so by giving you declarative levers to control the scope of your deployment.
CD-as-a-Service has four kinds of constraints that you can use to control your deployment:
- Manual Approvals
- Timed Pauses
- External Automation (Webhooks)
- Automated Canary Analysis
You can use these constraints between environments and within environments:
- During your next deployment, you need to issue a manual approval between
stagingandprod. - Within the
proddeployment, CD-as-a-Service creates a traffic split between your app versions: 75% goes to the old version and 25% goes to the new version. CD-as-a-Service waits for your approval before continuing the deployment.
Deploy
Start your second deployment:
armory deploy start -f https://go.armory.io/hello-armory-second-deployment --account <my-agent-identifier>
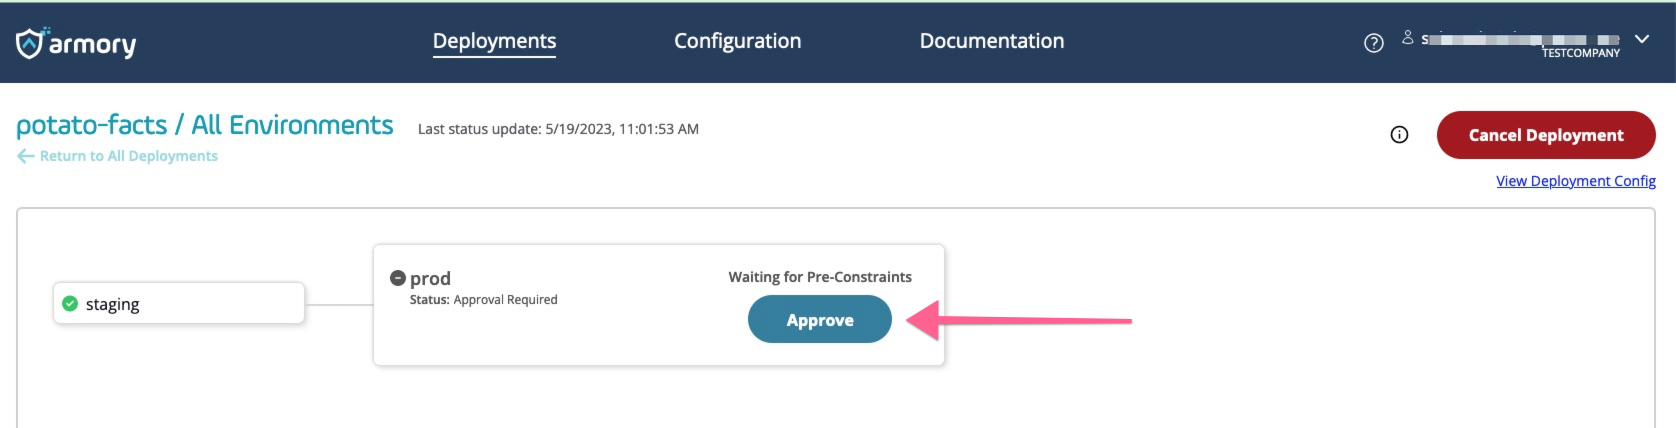
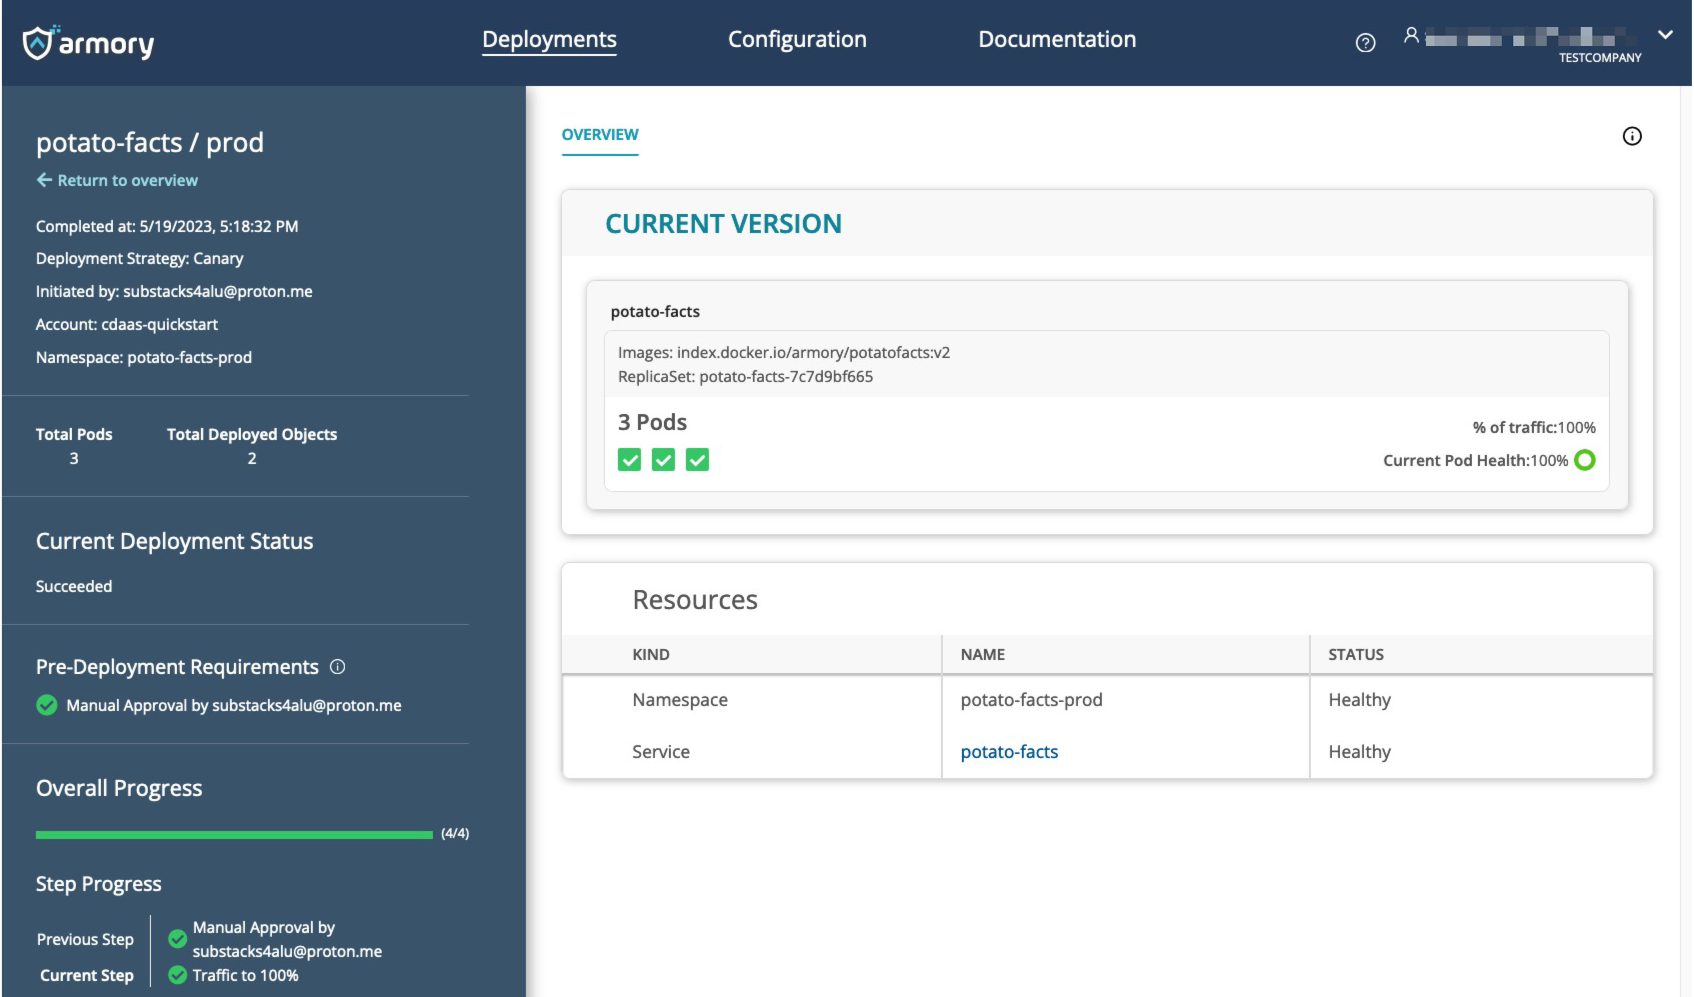
Use the link provided by the CLI to navigate to your deployment in the CD-as-a-Service Console. Once the staging deployment has completed, click Approve to allow the prod deployment to begin.
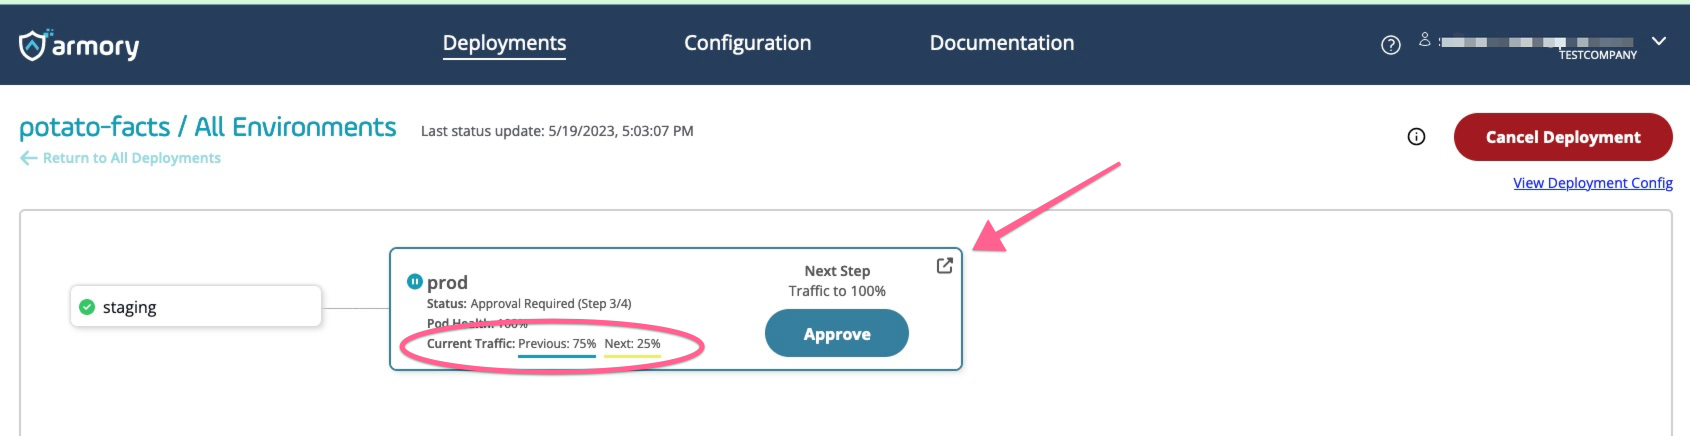
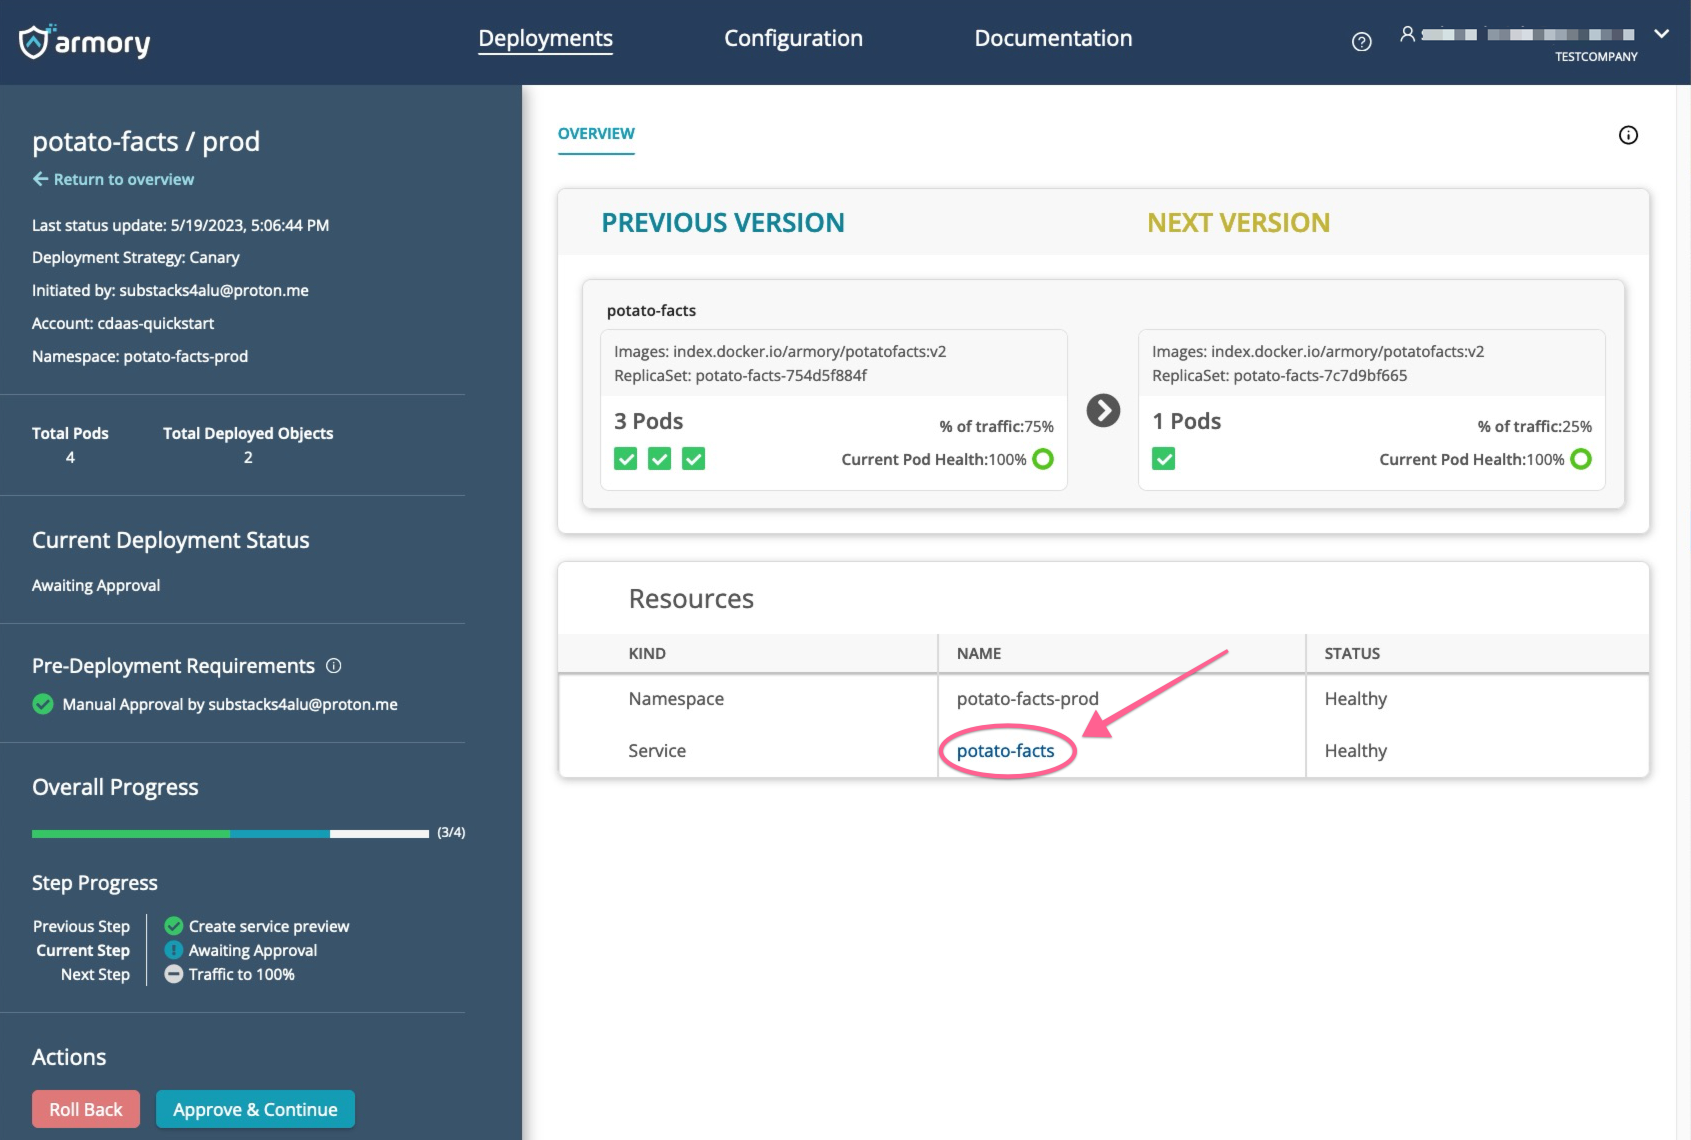
Once deployment begins, you can see the traffic split. CD-as-a-Service has deployed a new ReplicaSet with only one pod to achieve a 75/25% traffic split between app versions. Click the prod deployment to open the details window.
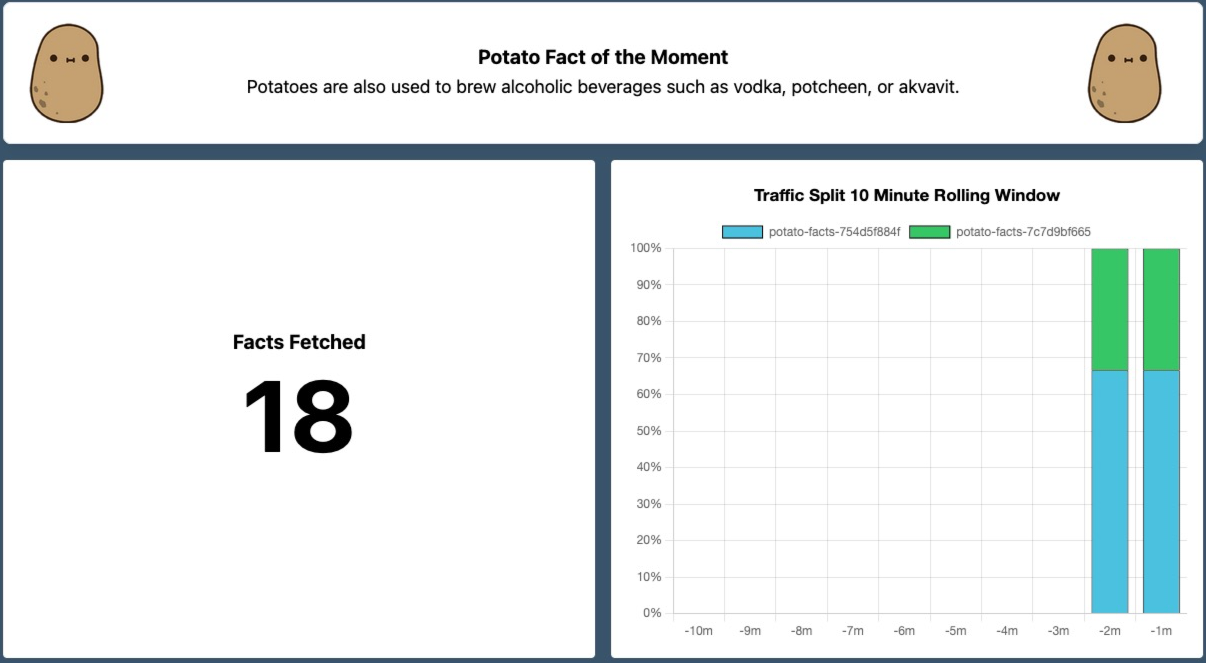
Click on potato-facts in the Resources section to open a preview of potato-facts.
The app’s graph plots the ratio of facts served by a given Kubernetes ReplicaSet. The ratio of facts served by ReplicaSet backends in the graph should roughly match the 75/25% split.
Return to the deployment details window. Click Approve & Continue to finish deployment. CD-as-a-Service fully shifts traffic to the new app version and tears down the previous app version.
Learn deployment file syntax
Now that you’ve used CD-as-a-Service to deploy to two environments, it’s time to break down the sample app’s deployment file. You can find full specification details in the Deployment Config File Reference.
targets
In CD-as-a-Service, a target is an (account, namespace) pair where account is the agent identifier you created when you connected your cluster.
When deploying to multiple targets, you can specify dependencies between targets using the constraints.dependsOn field. In this guide, the prod deployment starts only after the staging deployment has completed successfully, and you have manually approved deployment to prod.
targets:
  staging:
    # Account is optional when passed as a CLI flag (--account).
    # It's also required if you'd like to deploy to multiple Kubernetes clusters.
    # account: <my-agent-identifier>
    namespace: potato-facts-staging
    strategy: rolling
  prod:
    namespace: potato-facts-prod
    strategy: trafficSplit
    constraints:
      dependsOn: ["staging"]
      beforeDeployment:
        - pause:
            untilApproved: true
manifests
CD-as-a-Service can deploy any Kubernetes manifest. You do not need to alter your manifests or apply any special annotations.
By default, CD-as-a-Service deploys all the manifests defined in path to all of your targets. If you want to restrict the targets where a manifest should be deployed, use the manifests.targets field.
A path can be a path to a directory or to an individual file. Each file may contain one or more Kubernetes manifests.
manifests:
  - path: ./manifests/potato-facts-v1.yaml
  - path: ./manifests/potato-facts-service.yaml
  - path: ./manifests/staging-namespace.yaml
    targets: ["staging"]
  - path: ./manifests/prod-namespace.yaml
    targets: ["prod"]
strategies
A strategy defines how CD-as-a-Service deploys manifests to a target.
A canary-type strategy is a linear sequence of steps. The setWeight step defines the ratio of traffic between app versions.
strategies:
  rolling:
    canary:
      steps:
        # This strategy immediately flips all traffic to the new app version.
        - setWeight:
            weight: 100
  trafficSplit:
    canary:
      steps:
        - setWeight:
            weight: 25
        - exposeServices:
            services:
              - potato-facts
            ttl:
              duration: 30
              unit: minutes
        - pause:
            untilApproved: true
        - setWeight:
            weight: 100
CD-as-a-Service integrates with service meshes like Istio and Linkerd, but you do not need to use a service mesh to use a CD-as-a-Service canary strategy.
CD-as-a-Service also supports a blue/green deployment strategy.
Clean up
You can use kubectl to clean up the app resources you created:
kubectl delete ns potato-facts-staging potato-facts-prod
To clean up the Remote Network Agent you installed:
kubectl delete ns armory-rna
You may want to keep the installed Remote Network Agent to use when working through other guides.
What’s next
- View the manifests and deployment config files for this quickstart.
- If you want to verify the
potato-factsweb app code for security reasons, you can view the app code in the public repo. This repo only contains the app code. It does not contain any deployment config files or GitHub Actions for this quickstart. - Deploy Your Own App
- Use Armory's GitHub Action to Deploy Your App Using CD-as-a-Service
- Configure a Blue/Green Deployment Strategy
- Configure a Canary Deployment Strategy
Feedback
Was this page helpful?
Thank you for letting us know!
Sorry to hear that. Please tell us how we can improve.
Last modified October 31, 2023: (f370fe9)